


Did you know that a window installation can fail before the window even arrives? The culprit is often an incorrectly sized rough opening. This seemingly simple measurement determines whether your window fits perfectly or becomes a costly mistake.
A window rough opening is the framed space in your wall where the window sits. Getting this measurement wrong leads to gaps, leaks, and structural problems. That's why understanding the window rough opening size chart is crucial for any window project. Premium manufacturers like Derchi doors and windows maintain strict specifications because they know precision matters.
In this comprehensive guide, you'll learn the exact measurements for different window types. We'll show you how to measure rough openings correctly. You'll discover professional preparation techniques that ensure a perfect fit. Plus, we'll share troubleshooting tips for common sizing problems. Whether you're installing new windows or replacing old ones, this guide provides everything you need for success.
What Is a Window Rough Opening?
Definition and Components
A window rough opening is the framed hole in your wall. It's where your window will live. Think of it as the window's bedroom - it needs to be just right.
The rough opening differs from the actual window size. Your window measures 24" x 36"? The rough opening needs to be bigger. This extra space isn't a mistake. It's essential for proper installation.
Every rough opening has three main components:
Key Components:
- Header - The horizontal support beam at the top
- Sill - The bottom horizontal piece (slopes slightly for drainage)
- Jack Studs - The vertical supports on each side
These components work together like a picture frame. They support your window and transfer weight properly. Without them, your window would literally fall out.
Why must rough openings be larger? Three reasons matter most. First, you need room for shimming and leveling. Second, insulation fits in the gaps. Third, buildings move slightly over time.
Standard Window Rough Opening Size Formula
Standard Window Rough Opening Size Formula
Here's the golden rule professionals use:
Rough Opening = Window Size + ½ inch
This means adding ¼ inch on each side. A 36" x 48" window needs a 36½" x 48½" opening. Simple math saves major headaches.
Window Size | Rough Opening | Gap Per Side |
24" x 36" | 24½" x 36½" | ¼" |
36" x 48" | 36½" x 48½" | ¼" |
48" x 60" | 48½" x 60½" | ¼" |
This clearance serves critical purposes. It allows for perfect alignment during installation. Installers can adjust for walls that aren't perfectly plumb. Weather stripping and sealants fit properly too.
Premium manufacturers like Derchi doors and windows engineer their frames for this exact spacing. Their precision tolerances ensure optimal performance. The result? Better energy efficiency and smoother operation.
Window Rough Opening Size Chart
Standard Residential Window Sizes
Getting the right measurements starts with understanding standard sizes. Here's your essential window rough opening size chart. We've included popular window types and their corresponding Derchi series.
Window Type | Actual Size | Rough Opening | Derchi Series Application |
Single Hung | 24" x 36" | 24½" x 36½" | S6 Series |
Double Hung | 28" x 54" | 28½" x 54½" | S6 Series |
Casement | 24" x 48" | 24½" x 48½" | Jinghong Series |
Sliding | 36" x 24" | 36½" x 24½" | E0 Series |
Picture | 48" x 48" | 48½" x 48½" | All Series |


Notice the pattern? Each rough opening adds exactly ½ inch to both dimensions. This consistency makes planning easier.
Quick Reference Guide:
- Single and double hung windows typically use the same series
- Casement windows need special hardware clearance
- Picture windows work with any series (they don't open)
- Sliding windows have unique horizontal requirements
Different window styles have specific needs. Casement windows require extra space for their crank mechanisms. Double hung windows need room for their balance systems. Picture windows are simplest - they just sit there looking pretty.
Measuring Your Rough Opening
Accurate measurement prevents expensive mistakes. Here's the professional method installers use.
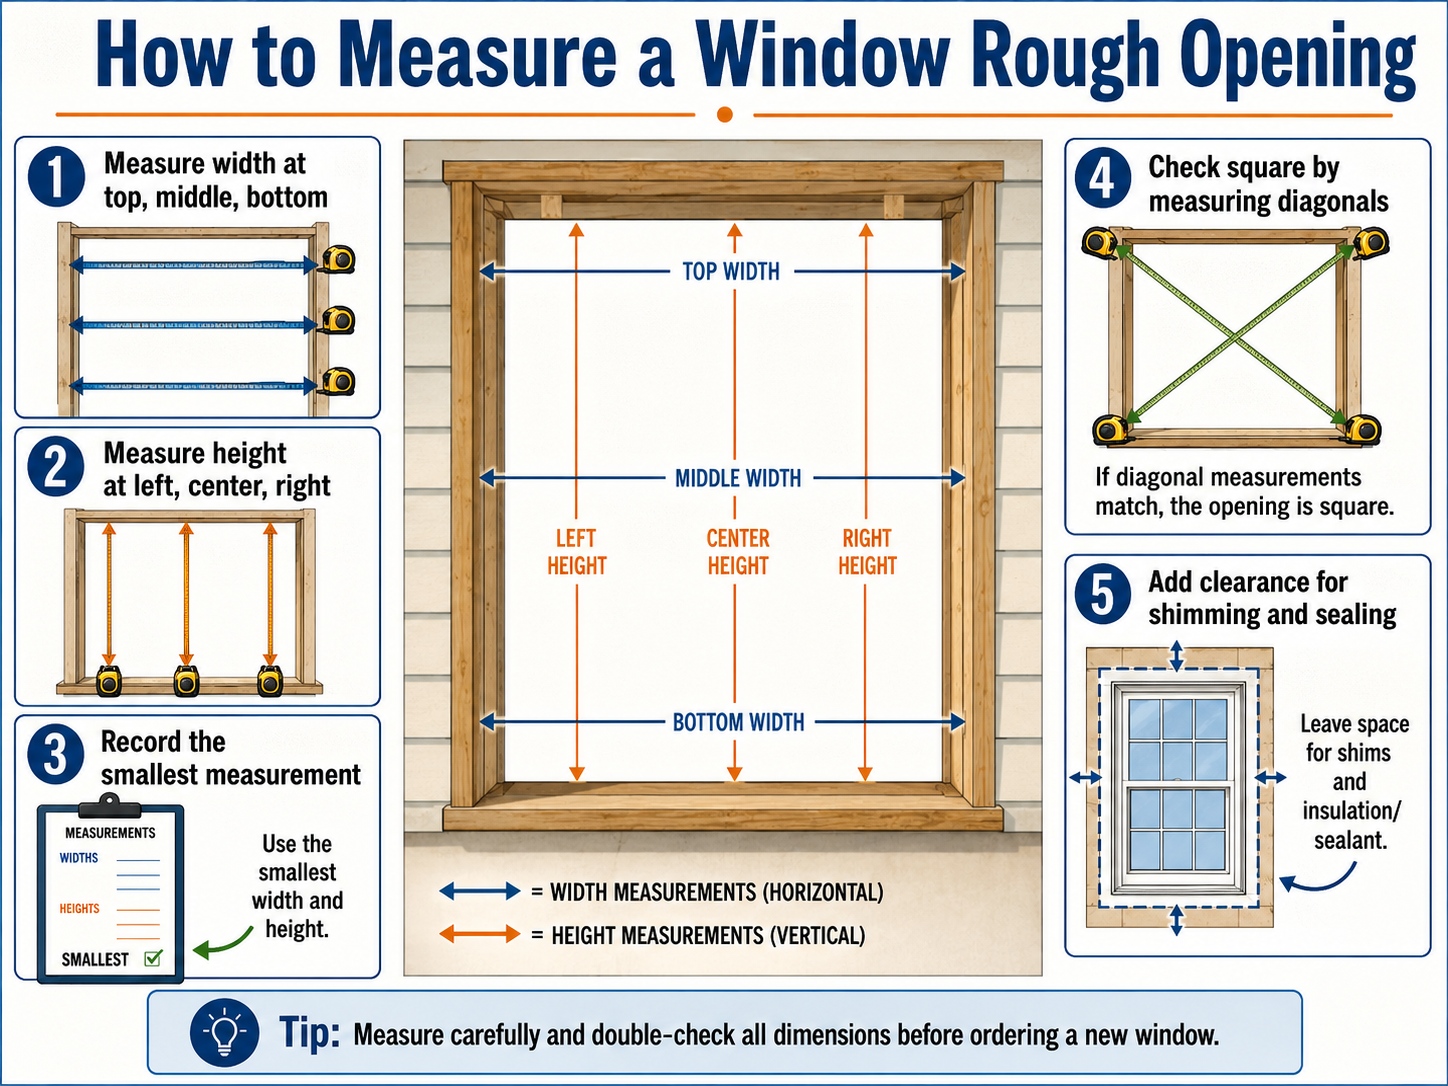
The Three-Point Measurement Method:
1. Width Measurements
- Measure across the top
- Measure in the middle
- Measure at the bottom
2. Height Measurements
- Measure on the left side
- Measure in the center
- Measure on the right side
Why three measurements? Walls aren't perfect. They bow, lean, and shift over time. Taking multiple measurements reveals these imperfections.
Critical Rule: Always record the smallest measurement.
Let's say your width measurements are:
- Top: 36⅝"
- Middle: 36½"
- Bottom: 36¾"
You'd record 36½" as your rough opening width. This ensures your window fits even at the tightest point.
Precision matters more with premium windows. Derchi doors and windows maintain strict tolerances in manufacturing. Their frames fit perfectly when you measure correctly. Sloppy measurements waste the engineering built into quality windows.
Use a quality tape measure. Have someone help hold it steady. Double-check every measurement before ordering. These simple steps save time and money.
How to Prepare a Rough Opening for Window Installation
Essential Checks Before Installation
A perfect rough opening needs three critical checks. Skip these and you'll regret it later.
1. Verifying Plumb and Level
Grab your 4-foot level. Check if the opening is perfectly vertical (plumb). Place it against both jack studs. Now check horizontally across the header and sill.
Here's what you're looking for:
Location | Tool Position | Acceptable Variance |
Jack Studs | Vertical | ⅛" over 4 feet |
Header | Horizontal | ⅛" over width |
Sill | Horizontal | ¼" (with slope) |
Crooked openings cause twisted windows. They won't open smoothly. Weather stripping won't seal properly either.
2. Creating Proper Sill Slope
Your sill needs a 5-degree downward angle. This prevents water from pooling. Standing water destroys windows fast.
How to achieve the perfect slope:
- Use a angle finder to verify 5 degrees
- Slope should tilt toward the exterior
- Maintain consistent angle across entire width
- Double-check with a marble (it should roll outward)
3. Installing Back Dam
A back dam stops water infiltration. It's your last line of defense.
Simple back dam options:
- Wood strip (½" high) sealed to the sill
- Rigid sill pan with built-in dam
- Large bead of quality sealant after window installation
Common Adjustments
Sometimes your rough opening isn't perfect. Here's how to fix it.
Opening Too Small
Never force a window into a tight opening. Instead:
- Use a circular saw to carefully trim the sill
- Remove material in small increments (⅛" at a time)
- Avoid cutting the header (it bears weight)
- Smooth rough edges with sandpaper
Safety tip: Always wear eye protection. Support the area you're cutting.
Opening Too Large
Big gaps create problems too. The fix depends on gap size:
Gap Size | Solution | Materials Needed |
Up to ½" | Shims only | Cedar shims |
½" - 1" | Add ½" plywood | Exterior plywood + adhesive |
1" - 2" | Add 1x lumber | Treated lumber + sealant |
Over 2" | Call a pro | Structural work required |
Apply construction adhesive before installing filler boards. Seal all edges to prevent moisture intrusion.
When to Consult Professionals
Some situations need expert help:
- Sagging headers
- Structural modifications
- Gaps exceeding 3 inches
- Load-bearing wall concerns
Quality windows like Derchi deserve proper installation. Don't risk warranty issues with questionable DIY fixes.
Why Accurate Rough Openings Matter for High-Performance Windows
Derchi Window Solutions for Precise Rough Openings
Derchi windows are available in multiple styles and custom sizes for residential and commercial projects. Whether you need casement windows, sliding windows, fixed windows, or customized aluminum window systems, our team can help match the product to your rough opening size.

Casement Window

Picture Window

Sliding Window
The Derchi Advantage
Premium windows aren't forgiving. They demand precision. Here's why Derchi doors and windows need exact rough openings.
Triple-Seal Design Requirements
Derchi's triple-seal system creates superior weatherproofing. But it needs precise spacing to work properly.
Seal Location | Purpose | Tolerance Required |
Outer Seal | Blocks wind/rain | ±⅛" maximum |
Middle Seal | Air barrier | ±⅛" maximum |
Inner Seal | Thermal break | ±⅛" maximum |
Gaps larger than ¼" compromise the entire system. The seals can't compress properly. Air and water find their way in.
27A Large Hollow Glass Support
Derchi uses 27A spacing between glass panes. That's wider than standard 20A spacing. This extra space improves insulation dramatically.
Why exact openings matter for 27A glass:
- Heavier units need proper weight distribution
- Uneven support causes glass stress
- Thermal expansion requires consistent gaps
- Frame deflection ruins the argon gas seal
Energy Efficiency Impact
Precision directly affects performance ratings. Even small installation errors hurt efficiency.
Performance losses from poor fit:
- ¼" gap: 15% efficiency loss
- ½" gap: 30% efficiency loss
- 1" gap: 50% efficiency loss
Your heating bills reflect these mistakes. Quality windows can't overcome sloppy installation.
Installation Best Practices
Proper Shimming Techniques
Shimming fills the gap between window and rough opening. Do it right:
1. Use cedar or composite shims (they won't rot)
2. Place shims every 12-16 inches around the frame
3. Support corners first, then middle points
4. Never over-tighten (frames will bow)
Common shimming mistakes:
- Using untreated wood (attracts moisture)
- Shimming only at fastener points
- Creating pressure points
- Forgetting to trim excess
Sealing and Insulation Requirements
The gap around your window needs proper filling:
Material | Where to Use | Key Benefit |
Low-expansion foam | Side gaps | Won't bow frame |
Backer rod | Deep gaps | Supports sealant |
Elastomeric caulk | Exterior joints | Stays flexible |
Fiberglass insulation | Interior gaps | No expansion pressure |
Maintaining Warranty Compliance
Derchi's warranty requires professional installation standards. Document everything:
- Photos of rough opening measurements
- Level/plumb verification
- Proper window rough opening size chart compliance
- Approved sealant types used
Keep receipts and installation records. They protect your investment.
Common Window Rough Opening Problems and Fixes
Out-of-Square Openings: Solutions
Discovered your opening isn't square? Don't panic. Check the diagonal measurements first.
Diagonal Difference | Solution | Difficulty |
Under ¼" | Shim during installation | Easy |
¼" - ½" | Adjust with tapered shims | Moderate |
Over ½" | Reframe the opening | Professional |
The 3-4-5 triangle method reveals square problems quickly. Measure 3 feet on one side, 4 feet on the adjacent side. The diagonal should equal 5 feet exactly.
Improper Drainage: Prevention Methods
Water is your window's enemy. Stop it before it starts:
- Install sill pans beneath every window
- Maintain that 5-degree slope we discussed
- Apply flexible flashing tape at corners
- Extend sill beyond the exterior wall face
Red flags to watch for:
- Water stains below windows
- Peeling paint on sills
- Soft or punky wood
Structural Concerns: When to Seek Help
Some problems need professionals immediately:
Call an expert when you see:
- Sagging headers (even ¼" drop)
- Cracks radiating from window corners
- Walls bowing in or out
- Load-bearing modifications needed
These issues risk your home's integrity. Don't guess with structural work.
Using Window Rough Opening Size Chart for Reference
Keep your window rough opening size chart handy during troubleshooting. It helps identify whether problems stem from incorrect sizing or other issues. Compare actual measurements against standard sizes. Variations often reveal the root cause.
Window Rough Opening Size FAQs
Q: Can I order custom windows based on my rough opening size?
A: Yes. If your rough opening does not match a standard window size, you can order custom windows based on your actual measurements. Always measure the width and height at three points and provide the smallest dimensions to the window supplier.
Q: What information should I provide when requesting a window quote?
A: You should provide the rough opening width and height, window type, quantity, wall type, project location, and any photos or drawings. This helps the supplier recommend the right frame size and installation details.
Q: Does Derchi provide custom-size windows for rough openings?
A: Yes. Derchi can support different window styles and custom-size requirements for residential and commercial projects. You can send your rough opening measurements to get a product recommendation and quotation.
Q: What's the standard rough opening for a 36x48 window?
A: The standard rough opening for a 36" x 48" window is 36½" x 48½". This follows the universal ½-inch rule, adding ¼ inch clearance on all four sides. This extra space allows for proper shimming, leveling, and insulation during installation.
Q: Does the ½-inch rule apply to all window types?
A: Yes, the ½-inch rule is the industry standard for most window types including single hung, double hung, casement, and sliding windows. However, always check manufacturer specifications as some brands may require different clearances for specialty windows or specific installation methods.
Q: How do Derchi's specifications differ from standard sizing?
A: Derchi windows follow standard rough opening sizes but require more precise tolerances due to their triple-seal design and 27A large hollow glass spacing. Their premium engineering demands exact measurements within ⅛" tolerance to ensure proper seal compression and maintain energy efficiency ratings.
Q: Can I reuse an existing rough opening for new windows?
A: Yes, you can reuse existing rough openings if they're in good condition. Measure carefully using the three-point method and check for square, plumb, and level. You may need minor adjustments like adding filler boards or trimming edges to match your new window's requirements.
Getting Your Window Rough Opening Right
Proper rough opening measurements make or break your window installation. The standard window rough opening size chart shows you need exactly ½ inch larger than your window size. This precision ensures smooth operation and prevents costly repairs.
Quality windows like Derchi doors and windows deliver superior performance when installed correctly. Their triple-seal design and 27A glass spacing reward precise installation with better energy efficiency.
Remember these final tips: measure three times, check for square and plumb, maintain proper sill slope. When facing structural issues or gaps over 2 inches, consult professionals. Your windows are a long-term investment. Install them right the first time.


